
I’m somewhat of a purist when it comes to classic gaming. In particular, when you get to older, pre-HDMI game consoles like the Super Nintendo, the Sega Genesis, or even the Playstation 2 and Wii, I connect those consoles only to an old CRT TV. You know, the big heavy TV’s most everyone above the age of 10 grew up with.
My unit in particular is a mid 2000’s Magnavox unit I got a few years ago at Goodwill. It has a few odd quirks, and about a year ago it actually began to power on and off randomly. I fixed that issue, (ironically by slightly shocking myself, which seemed to reset something on it) but something else constantly bothered me – the TV picture alignment was off. Rather harshly.
Now, of course this TV isn’t used for watching of, well, television broadcasts – Analog TV ended in 2009, and I don’t have cable (I use online streaming) so, there is basically nothing to use this TV for other than games, and old media (it’s great for VHS, DVD, and Laserdisc, after all!) While one can ignore the off center image when watching most movies, video games tended to show this misalignment. In particular, Sonic The Hedgehog demonstrated this amazingly well, and will serve as the demonstration game in this article.
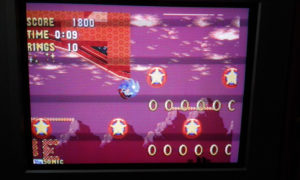
The very off-center image as it was – note the purple overscan border area
How To Fix This
Television sets are funny little things – you would think there would be simple alignment settings on them. However, probably to keep end users from making things worse, there aren’t. Not any complex options, anyway. Sure, you can adjust the color, tint, etc on your set just fine, but how about the electron gun strength? The various settings for screen geometry? Positioning? Rarely are those end-user accessible, save for old school CRT computer monitors (for some reason those let you do most anything. Go figure!)
To adjust such settings, you have to go into what’s known as a service mode, a special menu set designed for service technicians to make necessary in depth adjustments to the TV Set. You aren’t normally supposed to be able to access these options, which usually are best accessed using a “service remote”, designed for techs to do their jobs, or, via a very select set of commands, this can be accessed using a normal remote.
I originally discovered service modes when needing to adjust a second TV I had purchased as a replacement for my main one when it was acting up – the geometry is way off on that unit (just my luck, right?) and while I could never quite get it fixed, I did learn generally how service modes work, and the kinds of adjustments that one can make to an old TV set.
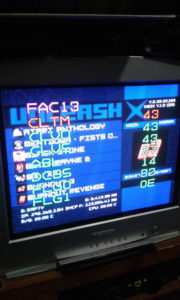
The service mode options are very very odd. Do any of these make sense to you?
Accessing Service Mode
So, how do I access service mode on my particular TV? Well, knowing the model number is key – that’s on the back of the unit. In my case, this TV is a Magnavox 20M series, to keep things simple. Eventually, after one hell of a hunt I found a website that mentioned a proper method of accessing service mode: Holding down volume on the TV, letting it reach zero, and then pressing info on the remote.
Sure enough, it worked, and I was in.
It’s worth noting that I have to use a universal remote with this TV, but thankfully the command was simple enough that the remote didn’t inhibit me from gaining access. Your results may vary depending on your TV, if you decide / need to adjust it.
Finding The Proper Settings
The thing about TV service modes is that they aren’t written in plain English – they use often times unique terminology, in shorthand form, no less, for their options. Basically, without a service manual, you are probably going to be lost unless something happens to seem logical (or you play around with settings and figure out what they do, but that isn’t sane – you could break something quickly and never get back to where you were, so take notes / photograph the screen, like I did).
In my case, I simply wanted to align the image to center. I might go about making minor adjustments and perfecting the picture as best I can in the future, but for now, just getting it aligned would be fine for me.
Digging through the menus, I found an option called “VCEN6”. That had to be vertical center. I adjusted it and the picture moved up. Excellent, I was in gear.
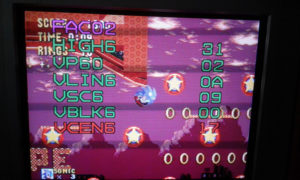
The “VCEN6” option, for vertical adjustment!
Now, the other problem was the horizontal positioning – I couldn’t seem to find that option. Eventually while pressing around on the remote I discovered that each number button brings up a new menu, and one of these menus happened to have an option “HPOS6” – Horizontal Position, perhaps? Sure enough it was, and with a few tweaks I had things set!
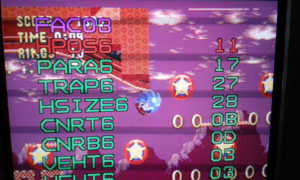
Horizontal Positioning found!
Of course, there are other options present that need some adjustment, and as you can see in the images I tweaked these a tiny bit – the goal was to have the overscan area on Sonic 1 to be just past the image – show as much of the game without showing the border! The before and after images should speak for themselves.
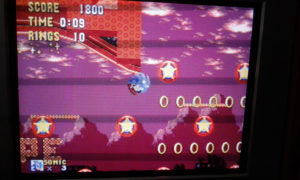
Post-adjustment. Compare to the image at the beginning of the article.
Results
I’m incredibly happy with how this turned out – for a 4AM random “I wonder what will happen” project, it came out very well. Things are much better aligned, and while I think a few options need a tweak here or there, it isn’t anything to really bother me, not like the original miss-alignment did.
I want my gaming and vintage media experiences to be as good as possible without defeating the purpose – this goes a long way to making my setup that much more enjoyable!
Consider this near-perfectly centered Guilty Gear XX title screen.
1 Comment
Add a Comment