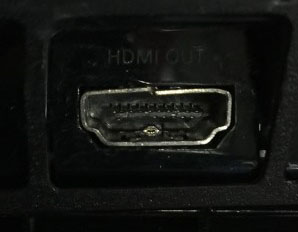
In case you didn’t know, PlayStation 4 consoles, mainly the original series but this is still somewhat true with the Slimline models, have incredibly fragile HDMI ports. While no HDMI port will withstand deliberate attempts to break it, PlayStation 4 ports seem to break far more readily than most any other console in the past decade – not even the similar-in-design Slim and Super Slim PlayStation 3 revisions. It’s truly a fragility unique to the PlayStation 4. See my previous article on the subject here!
At my workplace, we repair these systems regularly. By regularly, I mean every few days at the least a new console comes in with a damaged HDMI port, and we have been repairing them for the past year and a half at least, if not longer — we don’t have a full count of how many systems we’ve repaired, but it’s easily in the 200+ range if I had to guess.

These are all local to Memphis, I might add. While it doesn’t sound like too many when you think about a whole city, you have to consider how many houses actually have game consoles, how many would have PlayStation 4’s, how many ports get broken, and how many people actually come to us to repair them — then compare that number to the number of other HDMI based game consoles out there where this rarely to never happens. It paints quite the poor picture of the machines design which, yes, is very flawed, but that’s not what I’m here to talk about. I’ve already done that previously, as can be seen here.
The point of this article is the fact that over the past nearly 2 years we’ve been repairing these systems, it’s never been me doing the actual repair. It’s an incredibly involved process and given my somewhat poor vision it’s not quite something you want to undertake without the right kind of tools to help you see things. I can do many other kinds of repairs and solder jobs, certainly, but something like that was just a bit too much, or so we thought.
Recently my boss ordered a pretty awesome microscope that lets us see the quite small pins of the HDMI port, allowing even my otherwise-blind self to actually see what the hell is going on. With that being in the shop, and me being enthusiastic with my ability to actually do such a repair combined with the fact that the store owner has gotten quite tired of being the only one able to do those repairs, it was time for me to take a shot at it.
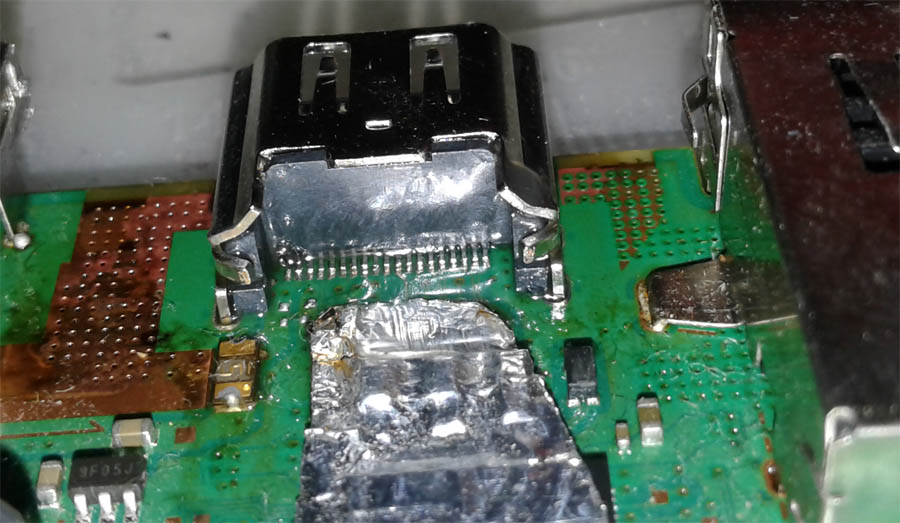
We’re talking about an area that’s easily half an inch at most in either direction – maybe 2 centimeters or so. Not much of an area to work with at all.
This came in two learning phases. Luckily, over the past nearly 2 years the process we have of getting the old port off without damaging the board, and then the actual dry-run on an already dead board.
The removal of a port happened on an actual customer board. Now, if you’ve never soldered or, more importantly here, de-soldered, anything, it’s a pretty interesting process.

It should also be noted when these ports break, it can be anything from subtle, but critical breaks in the core of the port, to the whole assembly being torn to bits or, in some cases, outright missing, the mangled corpse of the port rattling around the game console!
The process goes like this (I’m going to presume here you know something about the nature of electronics soldering but if not here’s a Wiki link. ): add some normal solder to what’s already there from the factory. Add more “low-melt” (lead based) solder to help weaken the joints even more. Add flux to everything, to help heat conduct. Turn the board over and use a heat wand at a reasonably high temperature to slowly, carefully, and steadily heat up and melt the present solder until the port just kind of falls off. This is critical as forcing the port off in some way can very well damage the fragile pads that the data pins of the port attach to. You never want to force a port off of the board.
Okay, so the port is off, and now you have a nice, solder residue covered port mounting area to contend with. Keep that solder molten and suck it out using a solder sucker of some kind, and use some solder wick to suck up the solder on the pads for the port.
Cool, everything is clean. Time to put down more flux, add some solder to the soldering iron, and go over the pads. The flux will keep the heat over the pads and in the now molten solder ball even, and help the solder to stick to said pads so that you can actually form an electrical contact with port itself — kind of critical, right? Right.
This is the “hard” part, as the port doesn’t quite want to sit right. In fact, this very aspect of the PlayStation 4 motherboard is part of why the ports are so fragile and seem to break so easily — they have room to move, and if put under stress they give. Even when we replace the port, they are still fragile enough that they can break again if someone is rough with them. That’s just how things are.
This is why for this half, which happened a later day, I used a dummy board, one that was already damaged, to get the process down. This way if I ruined it, there wouldn’t be any loss other than a cheap HDMI port.
Anyway, if you can manage to get the port positioned correctly, cool. Solder it back onto the board via the 4 anchor points and hope it stays put. If it does, great, you should have the data pins lined up so you can solder them to the board. Welcome to the most intense soldering experience at least I’ve ever dealt with.
This process involves, you guessed it, more flux, and a very steady hand. The microscope really helps most here as it gives you a wonderfully close up view of everything, as it should. Now’s the time to very carefully heat up every pin and ensure it makes a solid connection to the pad underneath, without touching anything else.
Enjoy. That’s, I think, 19 pins, each the width of a human hair. Use the right temperature on your soldering iron, the right amount of flux, and a steady hand and if you do everything right you should get solid connections on all of the pins.
This, amazingly, wasn’t actually as hard as it should have been. The microscope was key to this. It let me see what I was doing far better than my normal, relatively poor vision would ever allow and since I do have a talent for soldering my first attempt came out pretty well.
In fact, beyond it being a rather ugly solder job (because I used sticky flux the entire time, a substance which leaves a bit of a mess but is easy to work with) and the fact that the port was leaning slightly back, everything was good. We coulnd’t test the board, but my boss looked over it and was honestly impressed – no loose pins, no bridged connections, nothing.
I’ve yet to try with another board. We’ve stayed busy so I haven’t had the time to really practice, but this was at least a promising start to me working on these oh so common but quite time consuming and in depth repairs.
The great thing is as much work as the process is, it is also somewhat fun. With all the negatives I can say about the PlayStation 4 as a piece of hardware, I will say they are quite pleasant to work on. Taking them apart and reassembling them is straightforward and the board design is quite nice, at least to me. I may not really care to play anything on the console but I’ll be damned if I won’t fix one if I can. That’s not just against my feelings on how we should treat technology but it’s also how I make money!
Comments